Showing posts with label tutorial. Show all posts

Monday, May 12, 2014

Easy as pyjama pants TUTORIAL

This is dedicated to my dear friend Linda, who has so bravely started her sewing practises and already finished at least 3 pyjama pants for her daughter and one pair for herself. May you keep sewing them pants and next time we'll have to learn something new, maybe shirts? And then dresses for summer! Or or what about bags??


 The whole pyjama pants fascination started when I made her a sewing kit for her birthday present. I cut the pants and elastic, drew the instructions and she just had to sew them together (and the finished pants look awesome by the way). I wanted to take pictures of all the stages, but I run out of time (sorry Linda!). But now I've taken photos of all those steps PLUS how to cut the pants without any pattern!! Interested?


So these are the pants we'll be making (the picture above). I didn't get any pictures of the finished pants on their own as she was watching me make them like a hawk and as soon as they were ready they were on her, and they haven't come off since. So I'm guessing we're having a pyjama kind of day. Anyone can make these so do give it a try, they are EASY!


You will need some cute flannelet fabric, existing pyjama pants, elastic and obviously scissors and a sewing machine. The pyjama pants, that you will use as a pattern, don't have to be exactly your child's size. Pj's are very loose so if it wasn't for the length, my daughter could still fit size 1 pyjama pants though her normal size now is 4. So I could even use size 1 pyjama pants as my pattern, but I would have to add enough length. Make sense??

I have tried to put two pictures side by side and I will give instructions below the image. Now let's get started already!


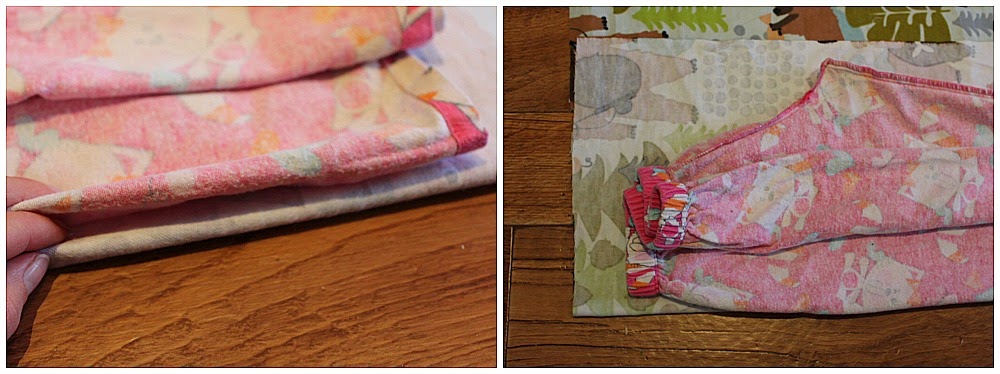
Turn the pyjama pants, that you are using as the pattern, wrong way around so that you see the seams. Fold the fabric so that you will fit one pant leg on it, right sides together.


 The long side of the pyjama pants will go along the folded edge of the material and the crotch is the curved part (image below, right side). Remember that you will have to leave plenty of fabric over the waistband as you will be folding it back to fit the elastic in the waistband of your new pants.


 Then it's time to cut! Start cutting from the bottom (here is where you add some length if you need to). Remember that you will be folding this over at the end as well so you need to add a little bit extra anyway. When cutting everywhere else I usually leave 1cm seam allowance (meaning I cut 1cm from the edge of the pattern piece).


 When you get to the cutting of your waist area remember that the elastic gathers the fabric. Meaning that DO NOT cut along the pattern pants for the waist, but instead cut straight after the crutch curve (look at the picture above again). If you don't like cutting with the pants on top of the fabric, use a pencil to draw around the pattern pants first and then cut along that line. This is totally optional and I for once don't do this.


Obviously you need too pants legs to to make pants, so to cut the other leg I use the one I've just cut. That way I don't have to leave any seam allowance and the two leg pieces will be exactly the same size.


 Now unfold your two pieces and put them together with right sides facing each other. Your pieces should look like the ones in the picture above. Then sew along the curved edges (along the black lines that I've marked in the image. Don't sew anything else just yet. Instead grab the scissors and cut a little strip off from the middle of the waist. I haven't marked it on the image (silly me), but you can see that the right end of the waist is higher than the left. The higher side will be the back of the pants and lower side the front.

Turn the sides that you just sew together and your pants will actually resemble pants! Now sew both of the legs. Start from the bottom of the other leg, doesn't matter which one, and go around to the bottom of the other leg. Your pants are now real pants. All you need is the elastic on the waistband so that the pants will stay up.


Use your child (if you're making these pyjama pants for her) to measure how long piece of elastic you need. Then fold the fabric around the waist and make it wide enough that the elastic will fit through it after you've sewn around the waist. I always use the elastic to help me make sure that it's wide enough. Pin down the waistband and sew around, starting at the back, but remembering to leave a gap where the elastic will fit through.


Picture on the left (above) shows the gap. Safety pin works great when you put the elastic through the waist.


Once you've put the elastic through the waistband, put the ends of elastic on top of each other and sew together. Then let that last bit of elastic go under the fabric and sew the gap closed.  


All you have to now do is the hem lines. I use an overlocker as you've probably noticed, but you don't need to. You can just as well do these pants without an overlocker. For example to finish the hem lines, just fold them twice like in the picture on the right. Sew the hems, turn your pants right way around and there you have it, your pyjama pants are READY!


 There you have it, no pattern needed pyjama pants that are honestly so easy to make! (If you have any questions or if I wasn't clear enough at some points, feel free to ask for clarification.) Now put them on, be proud of yourself and send me a picture! I love seeing all the creations you guys do. And sleep tight with your new pyjama pants that you have done all by yourself!


Monday, March 31, 2014

Portrait of a 3 year old


I am so in love with this portrait that Emma made today! Well yes I did help her a bit, but we'll get to that in a moment. First, THIS was our inspiration. I love pinterest and Emma loves hovering over my shoulder, so when she saw that picture, she asked me if she could make one like that of herself and I jumped right up from the couch to get our painting gear ready. Please don't mind the blurry pictures that I took with my phone, it's like a second nature that phone nowadays that I've totally forgotten what a normal camera looks like.

I'm always beating myself up when I try to direct the way she is creating her art, but this time I thought that it might be fun to make it together. Help her where she wants/needs help and just enjoy the time that we are painting together. This attitude adjustment was all I needed and we had so much fun, in the end I realised she did most of it on her own anyway. But just to be clear with you all, I'll tell you what my role was, aka what I did and what's all her.


 We started out by painting the head; she did that all by herself. I made the neck and the outline of her shirt as her drawing level is not there yet, she then coloured them in. She also painted the eyes and asked me to draw the mouth as she wanted it to be like in the picture.

We used acrylic paints for the whole picture, but for the hair I gave her cups with a very little water and she mixed some paint in them. I helped her in dropping some of the watery paint mixture around the face and she blew through a straw to make funny hair.


Above is what the picture looked like after she was done with the paint. I gave her a marker and asked her to draw the nose and the eyebrows. Then I went around the eyes, the mouth and the head with the marker. Below is the finished picture.


I think this picture will be framed for a very long time. It was so much fun to do and she is so proud of what she's created. If you look at the picture at the very top you'll see photo where she is about one month old. I can't believe 3 and a half years later I have a picture next to that photo made by that little baby girl. How amazing are these little people, how much talent there is, it all blows me away. And wow how truthful that self portrait is of her, so much attitude and craziness and I am so lucky to be able to be part of her world everyday. Bless you little artist.

Friday, January 24, 2014

Diy Sponge Ball


Do you know those water toys that you can throw at someone and they are soft and squishy and lots of fun, but sadly cost a bit too much to have many. What if I told you that you can make them yourself with the cost of couple of dollars! Presenting to you Sponge Bob Ball!


 For one ball you will need 3 sponges, I had them all different colour, but you could have just two colours or even one colour. Then you need an elastic band and scissors and that's it.


 Cut your sponges in 8 equal pieces, the easiest way to do this is to cut the sponge first in half, then that half in half and those halves in half. And that's why I have the pictures above, it makes more sense when you look at them. Once you've cut all your pieces then just put the elastic around them. Now make a few more of these and you are ready to have a good old water fight.


 Here I tried for you guys what it would look like if you used just half of the sponges. Not so good in the looks for Sponge Ball, a bit too thin, but the kids didn't mind it. This is our new favourite toy in the pool. It's so much fun to throw at each other or throwing it in the air and trying to catch it.


Tuesday, January 21, 2014

Super quick summer toy for water play


We are taking full advantage of summer and we are loving it. Out little blow up pool gets so much use every day, even I've jumped in a few times. You don't need fancy toys to enjoy you summer, so today I'm just quickly popping by to give you a great toy idea that you can do with no cost.

All you need is an empty ice cream container or yogurt container or any container that you wish to use. I'm sure you will have something like that around, I mean who doesn't eat ice cream during summer?! Then you will need a drill. Don't try this with a knife, it doesn't work, trust me... Drill works great.


Once you've got your two items just drill away. When you're finished drilling holes, pull out those few pits of plastic that are left hanging on your container. Super easy! This took me less than 5 minutes to make and we're playing with it every single day. The kids put it in their head and pretend to be astronauts, we make a shower for some of our other toys with it, we make rain and sing rainy day songs. It is the bomb summer toy.

Now excuse me as I head back out there.


Saturday, December 21, 2013

DIY candy cane wreath

I have had such a hectic week at work that I haven't had any time to think about Christmas presents. Now I'm on holidays and I still have a few presents to make. Lucky all I'm making is quick presents. Feel free to use all these ideas that I've already shared and will share, put your own spin to it and send me a picture, pretty please!


This next one is a candy cane wreath. Super easy, super quick and super cheap, so all in all a really super! I would have had heaps of candy canes left over if iI didn't do this... It's so easy that the pictures will tell the whole story.

 So quickly, you need about 10-12 candy canes (I used 12), a small circle cut from strong cardboard and your hot glue gun. Glue your candy canes on the cardboard making heart shapes. Turn it around and use a bit of stamping ink to colour the edges. You could also right a message in the circle. Put a bit of ribbon through one heart and you're done.

This would be a really great gift for your neighbours. I put it on our door, but I might make some for our neighbours too. It took me maybe 15 minutes to make this!


Monday, December 16, 2013

Diy superhero mask

Here's the instructions for a basic superhero mask, it will take you 10 minutes to make! It's so quick that even these instructions will be short.


Materials:

  • mask template (print THIS one)
  • felt
  • elastic (12'' / 30cm)
And of course you'll need scissors and a sewing machine, but that's just common knowledge.


First print your template and cut it out. Then using the template cut your mask out of felt. Cut the eyes too. Then measure elastic (I cut mine 12'' / 30cm and that works great for my kids and even me) and sew each end on the opposite sides on the mask. You're done!

Merry making guys!

Thursday, December 12, 2013

Diy dress up present for a boy // SUPERHERO cape

I've been feeling very sick for this week. My body must be still in Finland, because it's getting sick in December even though here it's so hot. Go figure. Lucky I'm only making quick presents this Christmas so I'm not exhausting myself too much.

Today I thought I'd share with you how to make a super quick dress up costume for a boy. Though I'm giving this for my daughter as she is playing superheros at the moment, so I'd say it fits well for both.


YES, it's a BATMAN cape! You don't have to make a batman cape, you could use this idea to make any superhero cape, or make one of each! Red for superman (or is that blue one?), green for ... I don't know enough about superheros, but you get my drift.

All you need is:

  • pillowcase (yes a pillowcase!, you could use an old sheet as well or old curtains.. anything that's material pretty much!)
  • felt (for your superhero logo)
  • ribbon or shoe laces
  • superhero logo template (google and print)


I started out by cutting the pieces for my batman logo. First I printed the logo out of the Internet and cut out the yellow oval and then the black batman from felt. Pretty easy so far. Then I sewed the batman on the yellow oval, this was a bit tricky so a more simple superhero symbol might be easier to begin with.


 After you're finished with the logo get your pillowcase and cut the long sides so you have one long piece of material. Then choose how long you want your cape and cut. Make a seam on the long sides so that they don't fray, overlocker does this one great, but if you don't have an overlocker then just zigzag the sides.

Sew your superhero logo to your cape. After that iron the casing where the ribbon will go through and sew that. Then put your ribbon through that casing with the help of a safety pin and you're done!


 I apologise that the pictures aren't too clear, but I don't have much energy at the moment to make them good. Oh well mentality over here. But I'm so happy how it turned out. Now my daughter doesn't have to use scarves as capes anymore, she will have a real batman cape!

Tomorrow really quickly a quick guide how to make the most basic superhero mask with a template to download.